First, the concept of surface roughness
During the machining process of the parts, due to the influence of the plastic deformation of the metal surface and the vibration of the machine tool and the tool marks left by the tool on the surface during cutting, the various surfaces of the parts, no matter how smooth they are processed, are observed under the microscope. You can see the unevenness of the peaks and valleys, as shown in the figure.

The microscopic geometrical shape feature composed of peaks and valleys with small spacing on the machined surface is called surface roughness. Generally speaking, the surface roughness formed by different processing methods is also different.
2. The influence of surface roughness on mechanical products
1) Surface roughness affects the wear resistance of parts. The rougher the surface, the smaller the effective contact area between the mating surfaces, the greater the pressure, and the faster the wear.
2) The surface roughness affects the stability of the mating properties. For clearance fit, the rougher the surface is, the easier it is to wear, so that the clearance gradually increases during the working process; for interference fit, due to the flattening of microscopic peaks during assembly, the actual effective interference is reduced. the bond strength.
3) Surface roughness affects the fatigue strength of parts. There are large troughs on the surface of rough parts, which are sensitive to stress concentration like sharp corner notches and cracks, thus affecting the fatigue strength of the parts.
4) Surface roughness affects the corrosion resistance of parts. The rough surface is easy for corrosive gas or liquid to penetrate into the inner metal layer through the microscopic valleys on the surface, causing surface corrosion.
5) Surface roughness affects the sealing of parts. Rough surfaces do not fit tightly, and gas or liquid leaks through the gaps between the contact surfaces.
6) Surface roughness affects the contact stiffness of parts. Contact stiffness is the ability of the joint surface of a part to resist contact deformation under the action of external force. The stiffness of the machine is largely determined by the contact stiffness between the various parts.
7) Affect the measurement accuracy of parts. The surface roughness of the measured surface of the part and the measuring surface of the measuring tool will directly affect the accuracy of the measurement, especially in the precise measurement. In addition, surface roughness will have varying degrees of influence on the coating, thermal conductivity and contact resistance of parts, reflectivity and radiation properties, resistance to liquid and gas flow, and current flow on the conductor surface.
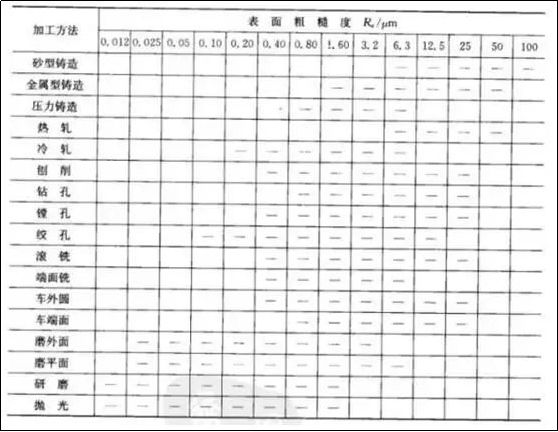
3. Common processing methods and attainable roughness values

4. Is the surface roughness the same as the surface finish?
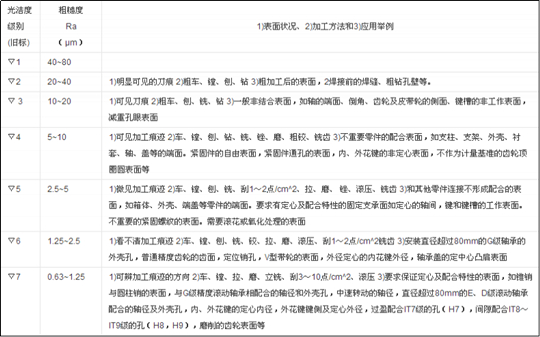
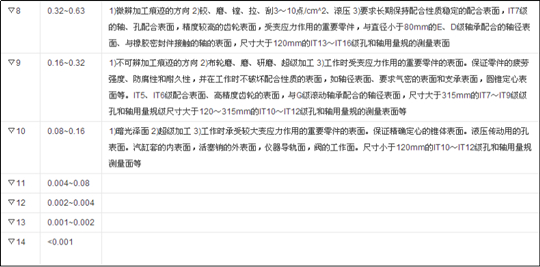
Surface finish is another term for surface roughness. Surface finish is proposed according to the human visual point of view, while surface roughness is proposed according to the actual microscopic geometry of the surface. Because of the conformity with international standards (ISO), China adopted surface roughness after the 1980s and abolished surface finish. After the promulgation of the national standards for surface roughness GB3505-83 and GB1031-83, the surface finish is no longer used.
There is a corresponding comparison table for surface finish and surface roughness (see the figure below).


Roughness has a calculation formula for measurement, while smoothness can only be compared with a sample gauge. Therefore, roughness is more scientific and rigorous than smoothness.
5. Why is the surface roughness value expressed as 0.8, 1.6, 3.2, etc.?
French engineer Renault saw that the wire ropes on the hot air balloon had many specifications, so he came up with a way to multiply 10 to the 5th power to get a number 1.6, and then multiply them to get the 5 priority numbers as follows: 1.01.62.54.06.3 This is a proportional sequence, the latter number is 1.6 times the former number, then there are only 5 kinds of wire ropes below 10, and only 5 kinds of wire ropes from 10 to 100, namely 10, 16, 25, 40, 63. However, this method of division is too sparse, so Mr. Lei made persistent efforts to divide 10 to the power of 10 to obtain the R10 priority number system as follows: 1.01.251.62.02.53.154.05.06.38.0 The common ratio is 1.25, so the wire rope within 10 is only 10 There are only 10 species from 10 to 100, which is more reasonable. At this time, someone must have said that the numbers in front of this sequence seem to be not very different, such as 1.0 and 1.25. Reasonable or unreasonable, let's make an analogy. For example, the natural numbers 1, 2, 3, 4, 5, 6, 7, 8, and 9 seem to be very smooth. We use this sequence to pay wages. Zhang San is given 1,000, and Li Si is given 2,000. Both of them are convinced. Sudden inflation, 8,000 to Zhang San and 9,000 to Li Si. In the past, Li Si's salary was twice that of Zhang San, but now it is 1.12 times. Do you think Li Si can be willing? He is the supervisor, and it is almost the same as sending him 16,000. Zhang San will not complain that the supervisor has 8,000 more than him. There are two ways of comparing this natural thing, that is, "relative" and "absolute"! The priority number system is relative. Some people say that his product specifications are 10 tons, 20 tons, 30 tons, and 40 tons. It seems unreasonable now, right? If you take twice, it should be 10 tons, 20 tons, 40 tons, 80 tons, or keep the head and tail, it should also be 10 tons, 16 tons, 25 tons, 40 tons, and the ratio is 1.6 is reasonable. This is "standardization". I often see people talking about "standardization" on the forum. In fact, they are talking about "standard parts". The work they do is to sort out the standard parts of the whole machine, which is called standardization. In fact, this is not the case. . For real standardization, you need to serialize all the parameters of your product according to the priority number system, and then serialize the functional parameters and dimensions of all components with the priority number system. Natural numbers are infinite, but in the eyes of mechanical designers, there are only 10 numbers in the world, and it is the R10 priority number. Moreover, multiplying, dividing, exponentiating, and rooting these 10 numbers, the result is still within these 10 numbers, how amazing! When you are designing, when you don't know what size to choose, just choose from these 10 numbers, how convenient you say! 1.0 N01.12 N21.25 N41.4 N61.6 N81.8 N102.0 N122.24 N142.5 N162.8 N183.15 N203.55 N224.0 N244.5 N265.0 N285.6 N306.3 N327 .1 N348.0 N369.0 N38 two priority numbers, such as 4 and 2, their serial numbers are N24 and N12 respectively, they are multiplied, and their serial numbers are added, the result is equal to N36, which is 8; division, the serial number Subtract it, it is equal to N12, which is 2; for the cube of 2, multiply its serial number N12 by 3 to get N36, which is 8; for the square root of 4, divide its serial number N24 by 2 to get N12, which is 2. What about the fourth power? N12*4=N48, there is none here, what should I do? The above list, without a number, is 10. Its serial number is N40. If the serial number is greater than 40, only look at the part greater than 40. For example, N48 looks at N8, which is 1.6, and then multiplied by 10 to get 16. . If the serial number is N88, look at N8 to get 1.6, then multiply it by 100 to get 160, because the serial number of 100 is N80, the serial number of 1000 is N120, and so on for mechanical design, it is enough to use these 20 numbers for a lifetime. But sometimes it is necessary to use the R40 number system. If there are 40 numbers, it is more complete. If it is not enough, there is also the R80 system. I have memorized the R40 number system by heart, and I don't need a calculator for general calculations. In simple terms, to calculate the torsion resistance of 45 steel with a diameter of 40, its torsion coefficient is 0.5*π*R^3, the torsional stress is half of the yield point 360, which is 180MPa, the pi is 3.15, the left and right hands pinch the decimal point, and add and subtract serial numbers mentally. Come out in a while. Did someone say you don't add a safety factor? Come on, should I take 1.25, or 1.5, or 2? Ha ha. The golden ratio is 0.618, which is 1.618, and there is also 1.6 here. The square root sequence is the square root of 1, the square of 2, and the square of 3. It is easy to find, right? (The serial number of 3 is N19) What is the square of π? equals 10. You think it's convenient when the pressure bar is stable, right? The torsion coefficient of the round rod is about 0.1*D^3. Now you can calculate the torsion coefficient by mouth, right? Why did the big screw jump directly from M36 to M40? Why does the gear ratio have a 6.3 or 7.1? Why does the channel steel have a 12.6 gauge that is rarely seen in the market? Why did the outsourcing factory call and say that there is no 140 square tube, but there are 120 and 160? Because the R5 number system takes precedence over the R20 number system. Why do the parameters of standard parts have a first sequence and a second sequence? Generally, the first sequence is the R5 sequence. Why does Inventor's screw hole list have M11.2? Now you know it's not a gibberish number, right? There are also steel plate thickness, section steel model, gear module, all standard parts, functional parameters on all industrial product samples, dimensional parameters, standard tolerance tables, etc., etc. Their sources are slowly becoming clear in our hearts at this moment. . It can be said that we have understood half of the mechanical design manual, as well as those industrial products that have not yet been made. Then, when we design a product, we can design a series at the same time, instead of the so-called "standardization" after the design; further, if the product is destined to be serialized, then we can even analyze the actual working conditions. Design products without knowing much, because the priority number system has all models included. The application of the priority number system, listed above, can be described as a drop in the ocean, and endless applications are waiting for us to develop ourselves.

 地址:No. 44 Zhangzhou Road, Dainan Town, Xinghua City, Jiangsu Province
 电话:0523-83991688
 邮箱:huisson@huisson.com.cn
 网址:www.huisson.com.cn
 点此下单:惠森棒材-阿里巴巴诚信通